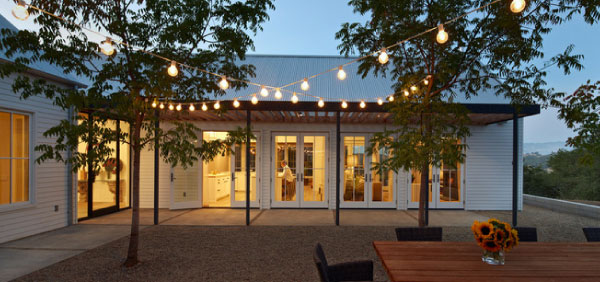
The proper lighting is essential to compliment any backyard space, but don't let the thought of electricians and motion-sensing spotlights give you the wrong idea. Elegant options are available to provide the ambience you want, so save the tiki torches for the frat parties and see how you can do it yourself.
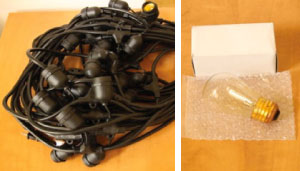
Patio Lights (we used the Drop Patio Lights in this DIY article)
Step One
Everybody has their unique requirements, but we'll cover the basic hardware you'll need, and just add or subtract depending on the size of your space.
What You'll Need
Step Two
DIY projects aren't always easy, but with these simple tools and clever methods you'll make it look professional all while staying within a budget.
How To Design
Step Three
Once your project is complete, give it some finishing touches to make all your hard work really shine (see what we did there).
Fine Tuning
What You'll Need
This all depends on how big of an area you want to cover, and what is available for structure to hold those lights up. Here's a list of supplies that worked for our project.
1/4" x 3 3/4" screw eye hooks (5ct)
3" metal carabiners (5ct)
2" Pipe U-bolt (4ct)
1/8" Cable (102 ft.)
1/8" Figure 8 Swag Sleeves (2ct) Metal Cable Loop Protectors (2ct) 3/8" x 10 ½" Turnbuckle Eye (1ct)
In this case, our patio was approximately 20'x22' with a 3' metal railing around the perimeter. Now this is a pretty manageable size, especially when the lengths of lights come in 48' and 100' sections. Since the house borders one edge of the patio, we had a variety of ways to hang the lights from high up, but the opposing side was going to pose a problem. To solve this, stained wooden boards were attached to the metal railing with sets of clamps to provide the adjacent anchor points from the house to hold the wires above head level. This design allowed the lights to be zigzagged across the patio to provide even, warm lighting.
Remember, there are several ways to make your own lighting, so customize it to work for your space to achieve the best results. All the supplies shown were gathered from the local hardware store, and lights/bulbs purchased from EZ Sales Lighting. The Swagging Tool can be purchased and/or rented from stores such as Home Depot if you plan on just one time use.
How To Design
Setting up the adjacent posts:
Stain/Paint as desired
Drill holes & screw in Eye Hook hardware
Clamp to posts with 2" Pipe U-bolt
Trim off excess thread length for a smooth finish
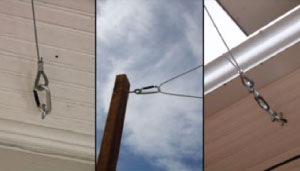
Hanging Hardware:
Find secure points for drilling (studs/beams)
Drill holes & insert eye hook hardware.
Creating the Loops:
Start with one end until you know exactly how many feet of cable you'll need.
Thread the cable through one side of the sleeve.
Pull a few inches of cable through and then feed it back through the other hole in the sleeve.
Insert the cable loop protector (this will help the cable keep it's shape & strength).
Using the Swagging Tool:
Use the corresponding teeth on the Swagging Tool to clamp the cables and secure the loop.
Trim the excess cable for a clean finish.
Finished & secured loops in cable.
Attaching the Lights & Cables
Anchoring the Cables:
Use a carabineer to attach it to the eye hook. Feed the cable through each of your other anchor points, connecting them each with a carabineer. This allows for the entire setup to be taken down in the off-season.
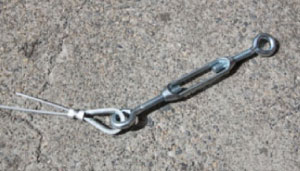
Tighten wit the Turnbuckle:
Once you reach the last anchor point, pull the cable tight and create the second loop in the same way as the first. You should have a few inches to play with between the cable and eyehook to insert your turnbuckle, which will allow you to tighten the cable as desired.
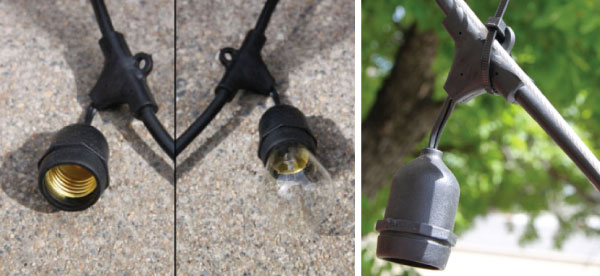
The Light Strands:
It's important you use quality lights made for the outdoors. We recommend the Drop Patio Lights. The wire is wrapped in a thick coating for durability, strong rubber gaskets encase every socket to form a weather resistant seal located every two feet, each bulb is 11 watts offering a warm glow that is very efficient. Patio Lights
Now that the cables are hung in place, it's time to start adding the lights. Start the string in the best way to connect it to a power source. The string comes with an 8-foot lead for the plug, so plan accordingly or use an extension cord that you can easily hide if you don't have an outdoor plug.
Once you have decided the direction of the cord, start on the plug-less end and start zip tying and securing the lights to the cable. The safest method is to use the small loop (pictured) and feed the zip tie through so it catches the cable as well, instead of it just hanging freely. This will be more secure and spread the weight of the light onto the cable instead of the tiny plastic loops. When you reach the end of the string, work your way back down the line adding light bulbs and trimming the excess zip tie tails for a cleaner look.
If the design of your lights is going to require extreme heights, hang the cable down while you work to add bulbs and zip ties and then pull it back into place when finished. Using zip ties allows the lights to slide on the cable and somewhat adjust themselves. This means you can tighten/loosen the cable without stretching or tearing the casing of the lights and wires.
It is Dark Yet?
Now that the sun has set, get out and switch your masterpiece on! The soft wattage and wide spacing provide a warm glow that is sure to lighten spirits and summer fun well into the evening. But don't forget to give yourself a pat on the back! You've turned that dark old patio into a bright and inviting place to entertain your summer.


Please complete your information below to login.
Sign In
Create New Account